myscenicdrives.com provides detailed descriptions of scenic routes across the United States. Now our latest feature, the Road Trip Planner, makes travel even simpler with the ability to create personalized and detailed travel itineraries. Some of the highlights are:
Best of all, it’s free with unlimited use for anyone with an account.
Once you are logged in, select Road Trip Planner from the toolbar and you are ready to plan your road trip.
Prefer video? Check out our Getting Started Video for an overview of how to use the planner.
We designed the Road Trip Planner to be simple to use. Not sure what one of our features will do? Just let your mouse hover over it and an explanation will pop up.
Our Road Trip Planner is a web browser-based application, so while you may want to hit back to return to a previous screen, it may not bring you to where you were. If you do not see your Road Trip, don’t worry — you did not lose it! Simply open the copy we automatically saved for you.
Lastly, if you have any questions, problems or feedback, just send us an e-mail or select and then . We respond to all e-mails.
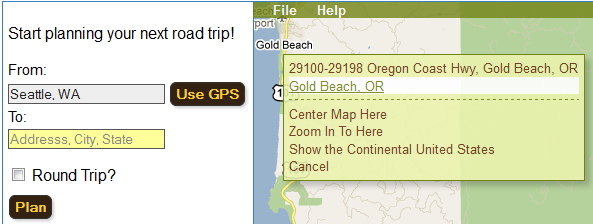
From the Road Trip Planner, simply enter your start and end points on the left hand side of the screen. You can enter this in any of these forms:
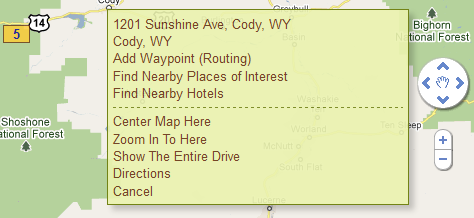
Or you can select your location from the map. Click on the map and then a selection will appear. Select one of the addresses or zoom into the area to get more specific.
If you are using a web browser released within the last year, you may also see a button that says . This button will use your computer’s IP address and your ISP information to guess where you are located. Click and your web browser will ask you if it is OK to share the information with us, and if you choose to, a geocode for your location will appear.
All details previously entered can be changed anytime. If you’re not sure exactly where you want to go, that’s not a problem either — just choose your first idea and make changes once inspired. But keep in mind, the more precise the information, the better our estimates and directions will be.
Once you have filled in these values, click and your road trip will be generated.
The default starting location is the Default Location stored in your profile, if supplied. You can easily change this by re-entering it.
If you want return directions, select the option. For example, if you are planning a road trip from Los Angeles to Sacramento and back, you can enter in Los Angeles, CA as your From address, Sacramento, CA as your destination address, and by selecting the Round Trip checkbox, we will automatically generate the directions from Los Angeles, to Sacramento, and back to Los Angeles.
You can create a Road Trip without the wizard by selecting the menu above the map and selecting .
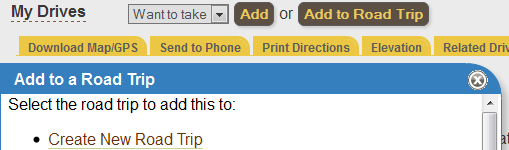
Start planning a trip from one of our Scenic Drives or Places of Interest, or add them to your existing route. Simply click .
If you are not already logged in, you will be prompted to login and will have to click again.
A list of road trips previously saved with myscenicdrives.com will appear. Choose from any of these routes or select and the Scenic Drive or Place of Interest will be automatically added to that road trip.
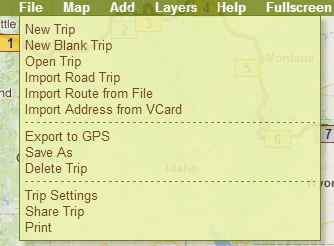
Previously created road trips or trips someone has shared with you can be opened by:
A dialog box will appear with a list of your road trips, the most-recently-updated at the top. By default, the road trips are named with the towns you entered when you first created your road trip (you may change this under the Trip Settings). Simply select the one you want and it will load.
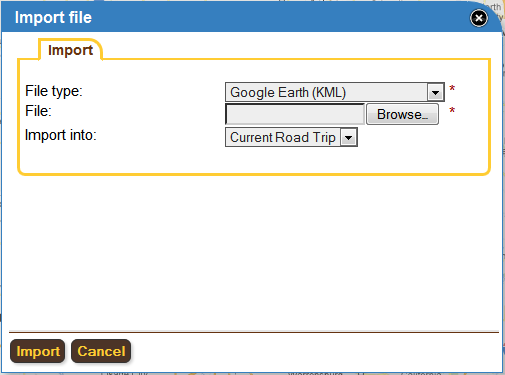
If you have created a route in another application, you can import it into the myscenicdrives.com Road Trip Planner. We support:
To import files, simply click the button on the first page or select in the top-left corner of the map and select . Once selected, a dialog box will open and ask you for the file type, which file, and if you have a trip open, whether you would like to import the file into the current trip or as a new trip. After entering in this information, click and the file will be processed.
If the selected file is a trace of a trip you have taken, the imported route may have too many points to be practically usable. You can use the Path Adjustments to automatically remove stops at preset distances. By default though, we do not alter your imported trip.
The file formats are usually standard, but glitches may happen. Should this occur, please e-mail us the file and we will look into it.
If you have planned a previous trip using our Road Trip Planner, you can import that entire trip into your new trip. You can use this feature for collaborating your trip planning with friends, fine tuning specific days, or alternate plans.
To use this feature, simply click the from the menu above the map. Here you will be able to select the trip you wish to import. After selecting your trip, myscenicdrives.com will proceed to import all the stops from that trip into your current trip, except for those which already exist in your current trip.
If you wish to append the trips together, be sure to check the “Do not optimize” option. By default, we will attempt to optimize the best routes for the two trips, but when this option is checked, we will simply append the stops.
Since Comma Separated Files are less defined, the myscenicdrives.com Road Trip Planner workflow for Comma Separated Files (CSV) and Tab Separated Files (TSV) is a little different.
If you are starting from Excel, you first need to save your document as a CSV. To do this, select File, Save As, and change the Save as Type to CSV (Comma delimited).
In the myscenicdrives.com Road Trip Planner, select the Import menu option from the File menu. After you have selected your file and have clicked upload, you will be redirected to a new page that allows you to see the data you have uploaded.
On this page, you will need to indicate which columns have which type of information. To be used, we require a minimum of a Latitude and Longitude or the components of an address to that we can geocode the information. The column types are as follows. Unless otherwise specified, if you set two columns to be the same type, they will be appended together.
We will attempt to auto-detect these fields from the first row. If we are able to determine any matches, the first row will be assumed to be headers and will not be imported.
The table on the page contains all the items which will be imported. If you do not want to import all of the stops, you can uncheck the box to the left of the row that reads “Import?”.
If you wish to change the value of a field in the table, you can click on the field and edit it inline.
Once complete, select the “Import” button at the bottom of the page and it will proceed to validate and geocode the values as required. In the event that any of the data is invalid, you will be informed of these and the rows will turn pink. Depending on the number of errors, you will either be able to proceed with the import or return to the editor to make adjustments.
As the CSV and TSV file-formats for GPS use is varied, if you experience any issues with the important, please e-mail us so that we can address them.
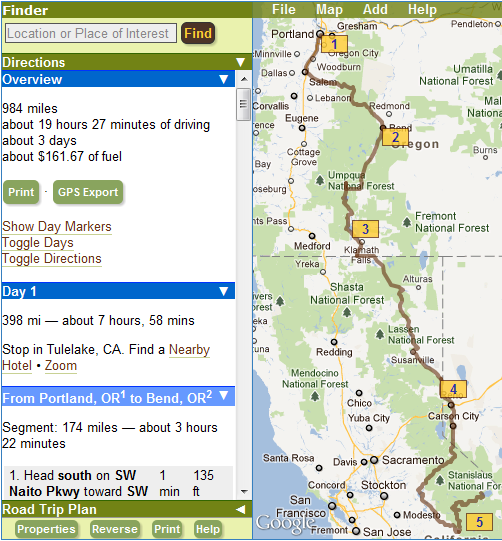
Our trip planner has four sections that work together to help you plan the perfect road trip.
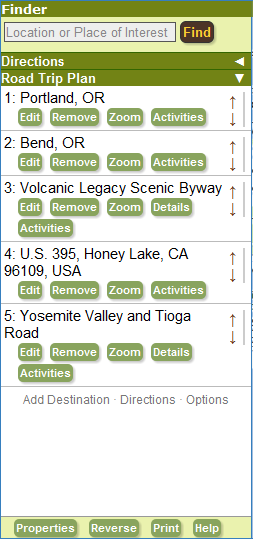
The Road Trip Planner outlines the places and attractions you want to visit, where to spend the night, etc. in a simple list. Use these tools to organize your trip:
Below the last item in your road trip plan are some frequently used functions, such as the Add Destination and Directions.
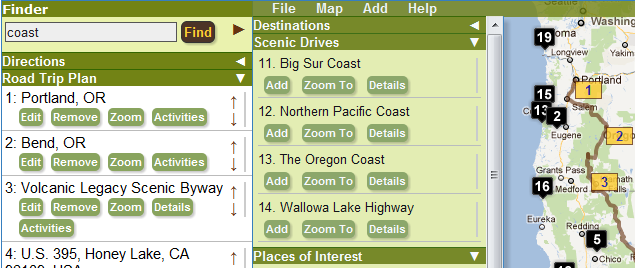
One of the best parts of the myscenicdrives.com Road Trip Planner is that you can search through our extensive database for stops using the Finder Search Box.
If you aren’t sure what to search for, consider using our Nearby Route Finder or clicking on the map in an area of interest and selecting the . If you are using Distance Circle, you can override the default range.
After typing something in and press your Enter key, Search Results will pop-up, separated into Destinations, Scenic Drives and Places of Interest and the map will display black markers matching the corresponding numbers.
Then choose:
On most browsers, you can also click on the stop and drag it to your Road Trip Plan or Activities.
On the map, you can also click the black markers to add them to your itinerary.
Some searches may have more results which you can access by clicking the below the search results.
To hide the Search Results, click the brown arrow (►) next to the Search box.
Once you have created your basic plan, check the Directions. You can find Directions above the Road Trip Plan or by clicking and selecting .
Whenever you change your road trip plan, you will need to update your itinerary by clicking . This process takes a few moments.
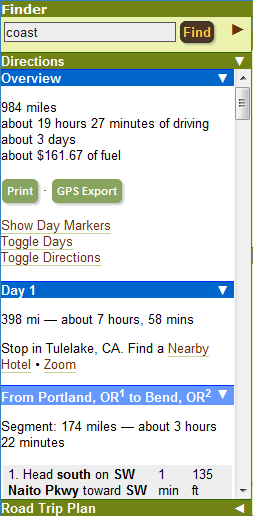
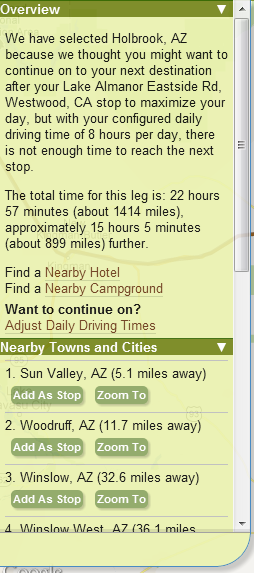
Directions are divided into Overview and Segments.
The Overview summarizes the number of miles, approximate travel time, notes about time zone changes, and approximate fuel consumption (based on the parameters in the Trip Settings) and related costs (See Managing a Budget).
The Overview section also contains buttons to:
Segments separate driving days. For road trips less than 1 day of driving, the directions follow from each stop to the next. For longer trips, the plan will be divided into days (based on your Trip Settings). For each day, if you have not pre-scheduled an overnight stop, the Road Trip Planner will automatically recommend towns where you can find accommodations.
Not satisfied with the route? Add a waypoint to make the Road Trip Planner use another route. The easiest way to do that is to zoom in on the map, click a road, and select . For best results, place waypoints in the middle of two existing stops and avoid placing waypoints at intersections and on the opposite direction of traffic flow.
The more information that you provide, the more accurate your road trip plan will be. For each stop which you plan to spend time at, enter that information into the Schedule by clicking the button either within the Road Trip Plan or on the Map. The goal of the road trip is clearly to unwind and to enjoy, so leave a little breathing room in your plan.
Visualize and plan your road trip directly on the map. We use a standard Google Map layout so you will feel right at home with the panning and zooming tools.
Each stop appears as a yellow, numbered box. Hover over the box and you will see the stop details, have the ability to Edit the destination’s settings, Zoom, Remove the destination, or Close the box.
Click on the map to add new stops, find destinations, or change the map’s location. The listed streets, towns, and cities are based on the location you have selected.
In addition to scrolling and using the zoom feature, you can also press shift on your keyboard and draw a square of where you want to zoom into on the map.
Add a waypoint to make our directions pass a particular stop. This is a useful way to encourage the Road Trip Planner to take a particular road.
If you are looking for things to do in a particular area, select the , which searches the thousands of recommended stops on myscenicdrives.com.
To find the local National Parks, select the option.
if you are flying to the area, you can find airports by selecting . This will find airports and give you an idea of how fair they are to the point on the map. This also includes the airport code and name to make it easy to find great deals.
will recenter the map at the location you have indicated, maintaining the current zoom parameter. Select to zoom right into the selected location, or zoom out to show the entire drive by clicking . The option will bring you to the directions quickly.
You can change the style of the map under the Trip Settings.
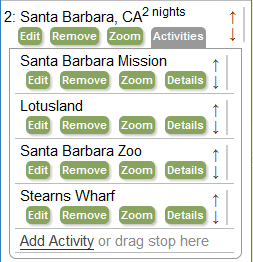
The myscenicdrives.com Road Trip Planner allows you to list activities for each of your stops. Activities are similar to your regular stops, except they are not scheduled and directions are not provided to them. Activities can be useful for:
To use Activities, first click under a stop. Once expanded, you can either click on the Add Destination or you can drag any stop from your Road Trip Plan onto it and release your mouse when the list expands. You can also drag any of the search results from the Finder.
Activities are exported to GPS Directions as Activities for file formats that support them, and Activities are displayed along your route in the Printed Directions.
If you need directions to these activities, we recommend creating a new Road Trip for the stop.
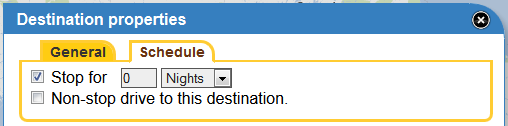
You can customize each stop in the Destination Settings. Most stops include a Schedule Tab allowing you to set the length of time at a stop, whether the time is part of your driving time or not, and whether you’d like to drive non-stop to that destination. Other tabs are dependent on the type of stop:
If the Destination Settings has a General Tab, you can enter in specific costs associated with the stop in the Cost field. For more information on budgeting, see Managing your Budget.
The myscenicdrives.com Road Trip Planner provides a number of scheduling options to allow you to better plan your trip.
To indicate that you want to stop at a particular stop, you can check off the “Stop for” check box under the Schedule tab of any of the Destinations and indicate how long you will be at that stop. If you are stopping there for a couple hours, you will also have the option of selecting whether or not to subtract the stopped time from the driving time.
If you have configured Start Times under Trip Settings, you will also be able to schedule when you wish to arrive at a particular stop or depart from that stop. Our Road Trip Planner will use your configured properties to adapt the time to the best options for your settings. Should we not be able to accommodate, a note will be added to your Directions and the To Do List indicating that.
If you have disabled the ability to divide your trip into days, the scheduling piece of our Road Trip Planner will also be disabled.
While the scheduling does permit you the ability to ensure that you have time for every moment, please keep in mind that travel times are estimated and that you should have extra time for unexpected delays.
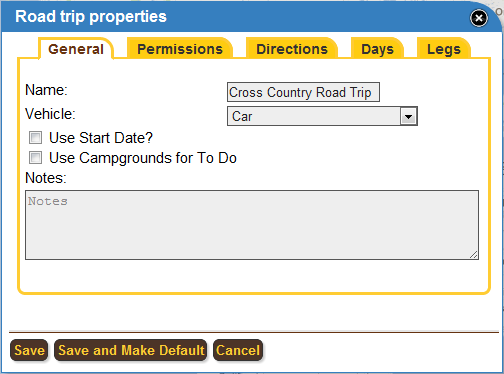
Customize your Road Trip by clicking on in the lower left hand corner or by selecting on the top right-hand corner of the map and choose .
Once in the Road Trip Settings window, the General tab allows you to:
In the Permissions Tab, you can give people permission to see and/or update your itinerary.
To Add Permission, type in the e-mail address, select whether you are granting them Read or Read and Modify Permission, and click Add. Or, use the Share Trip feature.
To Remove Permission, select the e-mail address from the appropriate list and click Remove under it.
Our permissions model is as follows:
In the Directions Tab, you can customize the Maps and Direction Features.
On this tab, you can also force myscenicdrives.com to be strict on your locations by checking the Do not change Stops fo Directions checkbox. We generally prefer you leave this off so that if your geopoints are not perfect, we can still usually route you to where you need to go.
In the Days tab, you can change the way that myscenicdrives.com divides your trips into days. Begin by selecting the default parameters.
Should you want to drive longer or shorter on a particular day, you can change the parameters here after updating the directions by selecting the Advanced button. For each day of your trip, you will be able to override the daily default for time or distance, start times, and budget.
Under the Legs Tab, you can set the road preferences such avoiding highways, unpaved, tool, or ferries by default.
To change roads for specific sections of the road trip plan, press the button (if present) then navigate to the leg of the trip you wish to change. To change the leg, uncheck the Use Default and then you can change the defaults for this particular segment.
You may create several trips on myscenicdrives.com and some of your preferences will be similar from trip to trip. In addition to simply saving your preferences, you can also click the button to make these preferences the default for future new trips you create on myscenicdrives.com. Certain fields, such as names, dates, permissions, and specific overrides will not be stored.
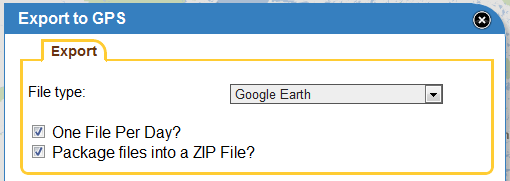
Have a GPS, app-based GPS that accepts files, or want to import your road trip into another tool? Simply export and load it in moments. We support various file formats, including Google Earth (KML), Garmin Communicator, BaseCamp and MapSource (GPX), Co-Pilot Live (TRP), Microsoft Streets and Trips, TomTom itineraries (ITN), TomTom Places of Interest (OV2), Comma Separated Files (CSV), and Tab Separated Files (TSV).
We know a lot of you want direct integration with Google Maps or Apple Maps, but currently this is not possible; we recommend a physical GPS or an app-bsaed GPS, which also works when you do not Internet connectivity.
There are a few options on downloading files for multi-day trips. You can either download one file with the entire route or have it divided into per day itineraries. Per day itineraries allow you to load your GPS with your trip for each day. Or you can have all per day files downloaded in a ZIP file format, which will include an Activities and Stops file for your trip.
If you are using a program which needs access to a link, you can enable the Direct Link option. To use this, you will need to enable “Offsite GPS Support”. You will be prompted to enable it if you do not have it enabled or you can change it in the Permissions Tab of the Trip Settings. Once enabled, you will have the link to the raw data which can then be copied and pasted into the application.
Specific instructions for how to use the file format is available in the Export Maps Help Section. Of particular note is the Garmin Communicator Plugin for exporting to your GPS. If you choose the One File Per Day option, it will automatically load all the files onto your device. This feature may not be compatible with all devices.
For CSV and TSV files, you can configure which columns are displayed. You can select from latitude, longitude, name, and description. You can change the order of the columns and add new columns as you need.
While we strive to make our maps and directions as accurate as possible, it is possible that there are flaws in the data or that road conditions, traffic, weather, and other events may result in changes to the planned route. Please use our GPS directions with common sense, obey the law, and please keep your eyes on the road.
Simplify the routes that are exported to your GPS. This feature delegates more of the routing to your GPS device which sometimes provides a smoother GPS experience. Note that it does not always provide the same directions designated by your myscenicdrives.com’s Road Trip Plan, but it does bring you to the same final destination. You have the following options:
If you are not sure which to pick, start with normal and then experiment with the other options to find the one that suits you best.
While we strive to make our maps and directions as accurate as possible, it is possible that there are flaws in the data or that road conditions, traffic, weather, and other events may result in changes to the planned route. Please use our GPS directions with common sense, obey the law, and please keep your eyes on the road.
If you have configured your trip with a Start Date in the Trip Settings, you can export your trip to your calendar, allowing you to know where your trip is taking you via your regular calendar interaction.
Once the Start Date is specified, select the menu above the map and select the option. This will generate an iCalendar file format which is usable by most popular calendaring applications.
When your web browser prompts you, you can either open it with your calendar on your desktop or you can save it. If you are using Google Calendar, you can use the iCalendar file using these instructions.
Sometimes when planning a road trip, it is useful to try out different variations.
Creating variations in separate Road Trip files allows you to keep all the detail and information safe while exploring other options. Duplicate your trip by selecting from the top-left corner of the map and select to create a new road trip with the same information. You will be prompted for a new trip name.
To return to the original Road Trip, select from the top-left corner of the map and .
Another use of the Save As is to refine sections of your trip or collaborating with others. Once you are complete with a section of your trip, you can also merge your changes back in via our Import Road Trip feature.
Save space and remove clutter when you Open Trips by deleting old trips. To do so, select from the top-left corner of the map and choose . The application will then ask you to confirm.
This results in all data being deleted and non-recoverable. Please double check that you are on the right road trip before deleting.
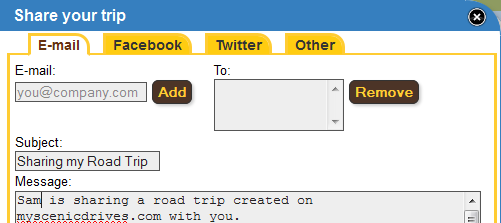
Sharing your Road Trip with family and friends is safe and easy. Send them a link using the Trip Sharer.
From the menu on the top-left corner of the map, select .
You can choose to either E-mail specific people or post the trip on Facebook, Twitter, or other Social Networks by selecting the appropriate tab.
To e-mail the itinerary, add the desired e-mail address(es), and if you like, customize the subject and message. If the email recipients do not already have access to your road trip, you will be asked to give them permission when adding their e-mail address.
To share on Facebook, Twitter, and other social networks, your trip must be publicly readable, meaning that anyone who has the link can see your full itinerary. Keeping your security in mind, we recommend removing specific addresses and reservations to ensure that your privacy is maintained. You will be asked to check the checkbox acknowledging this. When you accept, for either Facebook or Twitter, the appropriate window will open with the link to your trip. For other Social Networks, such as blogs or forums, a link will appear that you must copy and paste into your message.
You can change the permissions anytime in the Trip Settings.
Even with the best technology, there’s nothing like a printed copy of your directions. Even if you elect not to print them, it’s a convenient way to share your road trip plan with friends and family.
To print the road trip plan, select from the lower-left corner of the screen or from the menu in the upper-left hand corner of the map, select .
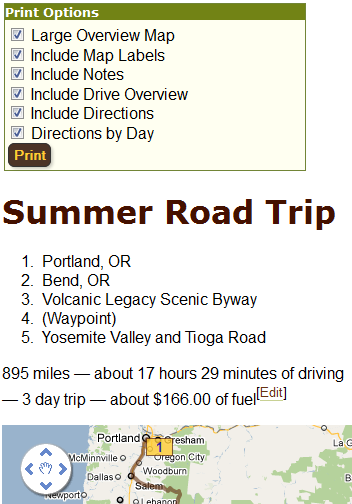
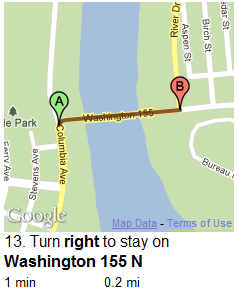
Printed directions are similar to the Directions in the Road Trip Planner. An overview of the drive indicates all of the stops, mileage, approximate driving time and approximate fuel costs. These values are determined by your Trip Settings. Below the overview is a large map and the directions divided by day, along with any notes that you have for each stop.
Above the Overview is the Print Options menu. From here, you can select which items to print:
While we strive to make our maps and directions as accurate as possible, it is possible that there are flaws in the data or that road conditions, traffic, weather, and other events may result in changes to the planned route.
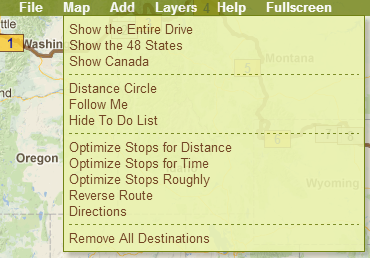
Choosing the right path from place to place can save time and money. Our Route Optimizer will try to order all of your stops to minimize mileage for your entire trip.
When you plan your trip, myscenicdrives.com will automatically try to add new stop where it will likely be best fit. For many trips, this will be sufficient but as we do not reorder the other stops, you sometimes may need to optimize the trip.
To optimize the stops, choose the menu above the map and select to minimize the distance traveled or select for the least time. Depending on how many stops and how complicated your trip is, this may take a few moments to calculate. Once calculated, the new order of the trip will be shown.
The Route Optimizer will find the most efficient route between the first stop and your last stop based on distance.
While we make all efforts to organize the stops as best as we can, we cannot guarantee that the order selected is the best. If you notice anything odd in your results, please let us know so that we can look into it.
For large trips, optimizations can take a very long time.
If you want to return using the same path, select from the top-left corner of the map and then select . On the newly created file, select above the map, and choose .
Selecting Reverse without creating a new file will undo your original plan.
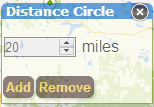
Our Distance Circle feature surrounds your mouse pointer with a circle whose radius is a configured distance. This is especially handy for planning trips in which a certain distance must be covered per day and for finding activities nearby your route.
To configure the Distance Circle, select the menu above the map and choose . In the upper right corner of the map, a dialog will appear where you can enter the distance and click . You can change the distance again by updating the value and clicking .
To remove the Distance Circle, simply click in that dialog box. If you have closed the dialog box, select the menu above the map and choose the option again to see it.
You can also pin the distance circle to the map at a specific location by clicking on the map and select Pin Distance Circle. You can undo this by clicking again on the map and selecting Unping Distance Circle.
While the feature is enabled, the myscenicdrives.com Road Trip Planner will use the distance information in the Nearby Route Finder and the functionality.
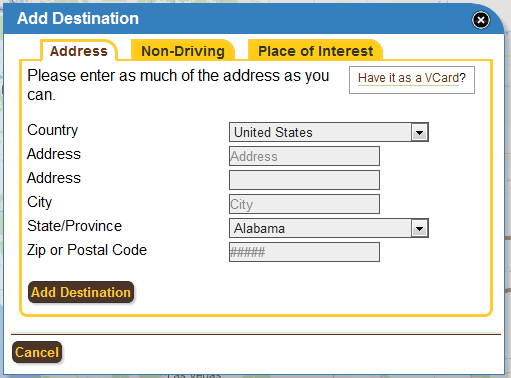
Use Add Destination to type in an address, find places of interests or nearby stops, or add custom activities. You can access this from the Add menu above the map or below the Road Trip Plan or Activities.
Under the Address Editor, enter as much of the address as you can. Once entered, the Finder will open where you can confirm the address and add it to your trip.
Under the places of interests tab, you can enter in queries to search through our database or find nearby stops along your selected route.
And if you have selected the Add Destination from the Activities menu, you can also enter in custom activities under the Activities tab.
Some of your road trips might include segments which you will be riding on something else, such as flights, trains, or ferries. You can add such travel details in the myscenicdrives.com Road Trip Planner by simply adding a “Non-Driving Destination”.
To do this, select the item from the Road Trip Plan or from the menu bar above the map and select the “Non-Driving” tab.
If you are adding a flight, check the “Is this a flight” which will do the airport code lookups. Enter in a summary of the flight under the Name field, such as the flight number. Then enter the Starting and Destination Airport codes and enter in an approximate travel time. Once complete, click the “Add Destination” button.
For all other travel, enter in a short summary of the trip under the Name field. For the From and To addresses, enter in the entire address of where you will be leaving and arriving, in the form of Address, City, State. Then enter in the approximate travel time, and click the “Add Destination” button.
Once the stop is added to the trip, consider editing the stop and adding in further details of the travel, such as confirmation numbers and seat numbers in the Notes field under the General tab.
A VCard is a popular Address Book file format which many e-mail clients and tools support. With a VCard in hand, you can quickly add the address as a destination.
To do so, click on the “File” menu above the map and select “Import Address from VCard”. A dialog box will appear allowing you to select a VCard on your computer and once selected, click on the “Import” button.
We will then attempt to extract as many addresses as we can from that file and a second tab will appear in the Dialog box with all the addresses we found. If we found more than one, arrows to the top right of the box will indicate how many we found and allow you to navigate from address to address. Once you have found the address you would like to import, click the “Add Address” below the address which will then locate the address and click “Add” again to add it to your Road Trip.
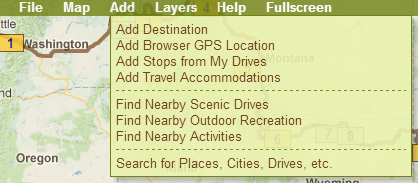
Most modern web browsers have the ability to detect your location based on your IP address. Results will vary, but you can try it by selecting from the menu bar above the map and choose . Your web browser will ask you if it is OK to share the information with us, and if you choose to, your location will be added to your plan.
If you are on the road with mobile browser or a computer with a hardware GPS and are using a browser that supports it, you can also use enable the Follow Me feature by selecting above the map and choosing . This will add a blue indicator on the map that will follow all updates that your GPS provides.
To stop following, select the menu above the map and select .
Search for campgrounds along your route either by clicking on “Find Nearby Campgrounds” near your directions or by clicking on the map and selecting “Find Nearby Campgrounds“. Campgrounds and their basic information will be highlighted and a simple click adds them to your road trip. Most campgrounds recommend reservations. Contact the individual campgrounds via phone or their website. You can note the reservation information in the notes of the campground’s settings.
Please note that our Campgrounds are presently being tested, developed, and expanded. Please let us know if you notice any glitches or have suggestions to improve your experience.
Quickly find scenic drives, outdoor recreation, and activities that are near your route from myscenicdrives.com’s growing database. While the Finder searches everywhere, this feature will highlight only the stops within 60 miles along your route.
From the menu above the map, select the type of stops you would like shown. Once loaded, myscenicdrives.com will show you all the routes along the way.
This can produce a lot of information, but we will only list 100 items at a time. You can get more results by selecting the button under the search results. To help filter the information especially for cross country road trips, you might consider outlining your basic route with waypoints or ensuring the Directions are up-to-date.
There are three categories to choose from:
Since myscenicdrives.com is always adding new scenic drives and content, if we are light in content in one area, be sure to check back before hitting the road. And if you know of some great spots, please let us know so that we can add it.
The myscenicdrives.com Road Trip Planner has full support for electric vehicles, providing the location of charging stations and reminders to recharge your vehicle. Begin under the Trip Settings and change your vehicle type to an Electric Car, and then on the Directions tab, enter the average distance on a full charge, the average cost for a charge, and the amount of time that a charge typically takes. This will enable all of our Electric Vehicle features.
We assume that you are starting off each day with a fully-charged vehicle. Using the above information, we will add a To Do reminder for recharging your vehicle based on the settings you have configured. By clicking on the To Do reminder, nearby charging stations will be located on the map. Note that the nearest charging station depends on availability. When you add the charging station to your road trip, we will automatically schedule the stop based on your charging time. In addition to using our To Do list, you can also click on the Map to find nearby charging stations.
You can also mark stops as a Charging Station under the Schedule Tab. While the default assumes a full charge, you can override the new available distance for your vehicle after the charge.
To aid in planning, you may also use the Charging Ranges from the Layers menu. This will show an icon on the map where your vehicle will require recharging.
The estimates are provided for informational purposes based on your entered information and may not account for delays, weather, and other conditions beyond our control. While we do make all efforts to provide accurate information regarding Charging Stations, some details may change beyond our control.
The myscenicdrives.com Road Trip Planner provides a number of features to help estimate and plan your budget. In addition to providing an estimated fuel cost automatically, you can also configure the Road Trip Planner to provide you with per-stop costs and daily costs.
To configure a per stop cost, click on the Settings link for the stop and select the General tab where you will be able to enter in the cost associated with that stop. For example, if you are visiting an aquarium that charges an entrance fee, you can enter the entrance fee here.
In addition, you can also enter in a daily budget amount under the Trip Settings’s Day tab. The default budget per day is the amount of money that will be spent for each day on the trip for things such as meals, lodging, entertainment, etc. You can enter in different amounts for specific days simply by placing another number in the day’s budget.
Once this information is provided, your directions will provide you with a breakdown and approximate total costs of the trip.
The budget and fuel cost is provided simply for informational purposes to help you estimate your trip.
One of the nice features of the myscenicdrives.com Road Trip Planner is its ability to seamlessly divide your trip into manageable days, allowing you to plan where you might spend the night and estimating how long it will take to get to wherever you are heading.
Before getting started in planning your days and scheduling your stops, start by updating the directions for your trip. You can do this simply by clicking the from the To Do List.
Next, we recommend that you configure your driving time parameters. In the Day tab of the Trip Settings, you can start by configuring your average daily driving time. The default is 8 hours of driving per day, which does not account for stops for breaks, meals, and fueling. When planning your trip, think of some of your previous driving experiences and choose a reasonable amount of time here that allows you ample time to reach your destinations but also reach it safely. To make the planning easier, you may also wish to enter a Start Date on the General tab so that the directions say a specific date instead of “Day 3.”
Also in this tab, you can provide specific driving times for a particular day. For example, say that you are leaving on Wednesday after work for your trip, so instead of driving a full 8 hours that day, you may only be able to accomplish 4 hours.
For any stop which you know you will want to stay there for a couple days, you can schedule it. To plan your days that you are there, we recommend the use of Activities or using another Road Trip Plan to get directions for your activities there..
In the Directions Pane, your information will be updated on any change. There are a few ways to plan your days using the information presented here. We usually recommend that you click the link so that you can quickly see where you will be for each of your days. In the Day Overview section, you will see how many miles and hours you will be driving for that day, and it will estimate where you will be spending the night. By using the Day Markers feature, you can also have an icon displayed on the map.
If we have selected a stop which is not exactly where you would like to spend the night, there are a few ways to address this:
Be sure to recheck your information after each change. Should the change have had some unintended consequences, you can simply Undo that change.
Our estimates for where you will be at the end of the day may be different based on driving conditions, weather, errors, and other things beyond our control.

The myscenicdrives.com Road Trip Planner includes a To Do List in the lower right corner of the Map which will help guide you through the planning process and to help you not forget anything.
To assist, the myscenicdrives.com Road Trip Planner will automatically notice and mention certain things throughout your planning process.
In addition, you can also add your own items to the To Do List by either selecting the menu and selecting the . Here you can add, remove, and complete your personally selected items. System generated items cannot be changed in any way.
You may hide or display the To Do list by clicking on the menu, and selecting or .

For multi-day trips, Day Markers will display an icon on the map at the end location of the day’s drive. Hover your mouse above the icons for specific details.
For Electric Vehicles, selecting the Charging Ranges will show an icon on the map where your vehicle may need to be recharged based on your Trip Settings. For more information, see the Electric Vehicle section.
You can display other trips created within the myscenicdrives.com Road Trip Planner as layers on your map. You can use the layers feature to avoid traveling the same roads as a previous road trip, planning different routes in the case of weather changes, or just visualizing all of your trips on one map.
To do so, select the menu above the map and select the . When the dialog opens, select the button, select a trip and a color, then select . The directions will be displayed on the map.
To hide the directions, select the menu and select the checkbox near the trip you are no longer interested in seeing, or select the and remove the trip by clicking the X to the right of the item.

The myscenicdrives.com Road Trip Planner allows you to quickly undo up to the last 5 updates to your itinerary. If you want to change something back, just select redo. The Undo and Redo menus are located under the menu.
If you are a keyboard user, you may appreciate these hotkeys from within the Road Trip Planner. Please note that some browsers may not support all of them as gracefully.
| Key | Function |
|---|---|
| Control-F Command-F | Find a Place of Interest or Address |
| Control-O Command-O | Open a Road Trip |
| Control-P Command-P | Print the Road Trip |
| Control-Y Command-Y | Redo |
| Control-Z Command-Z | Undo |
My Places of Interest allows you to create a searchable database of your own locations within our Road Trip Planner simply by uploading a CSV file. Route planning is easy and efficient with the ability to add your addresses to any trip, search your secure locations by name, city, or state, or simply click on the map to find your nearby locations.
My Places of Interest is a paid feature.

Create, update, and track your road trip on the go, using your smartphone’s web browser. Our mobile-friendly website offers a single, full-screen, touch-friendly interface that requires no software installation or updates.
Similar to our desktop version, you can start by entering your start and ending locations, or by opening an existing road trip. Once in the editor, choose from four sections at the bottom of the screen: Road Trip Plan, The Finder, Directions, and Map.
To access items within the , , , or menus, simply click the  button on the right of the screen which will highlight the list of available options. To return, simply click it again or click .
We have worked hard to make the mobile version of the Road Trip Planner friendly and easy to use. Please let us know if you need any assistance.
The Mobile Road Trip Planner is currently only supported on IPhone, IPod Touch, and Android devices. Please contact us for support on other phones.
To install to your IPhone, IPod Touch, or IPad Home Screen, share icon in Safari and then tap the .
To add myscenicdrives.com to your Home Screen on an Android device, it depends on which version of Android you have.
If you have an older device, then:
myscenicdrives.com is built using various sources, including some information from Mapbox, and OpenStreetMap.